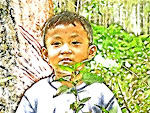
If you have image with color that looks too dark, you can make some correction. First you need to do is adjust the shadow/highlight, Select menu Image -> Adjustment -> Shadows/Highlight, drag the slider until appear best shadow and higlight, and just click OK.
Maybe you still need to adjust the exposure too with menu Select -> Adjustment -> Exposure, drag the slider smoothly until you get best lighting for the image.
If still need another adjustment it maybe the Level (Select -> Adjustment -> Level, or Ctrl-L) and Curve (Select -> Adjustment -> Curve; Ctrl-M). Just drag the slider until you get the best result.
Have a nice try...
03 November 2009
12 May 2009
Tips and Variety Lighting in Photography
In photography, the lighting is the key to success to get the desired results of the image. The lighting is very related to the diaphragm (APERTURE) and speed (SHUTTER speed).
If the pocket digital camera equipped with manual shooting mode, the diaphragm and the speed is set by the photographer. With the lighting mode that can be adjusted (manual shooting mode) lighting are usually more accurate compared with the auto shooting mode.
1. Over Exposure
Over Exposure is image with too much lighting (looks brighter than it should be). The excess carrier is lighting settings with APERTURE SHUTTER speed that is not appropriate. If seen in the matering, matering needle position in the area plus (+). As a result of excess exposure, the resulting image appears dominated by white / light.
There is mention of this with excess lighting harz term. Over Exposure can also be caused by a stroke of the flash is too strong / This can occur if the distance between objects with the flash (flash) is too close or too full of the photographer set the flash output.
2. Under Exposure
Exposure over from the opposite, is the lack of lighting (image looks too dark). The causes are the same, not the sesuainya APERTURE SHUTTER speed and (-). Under Exposure is usually also caused by a flash strike that is too weak. This can occur if the distance between objects with too much flash or the photographer is too minimal set flash output.
3. Light from the Home Object
Memotretlah with the object facing the light, not the photographer facing rays. Light coming from the front of the object will illuminate the body evenly. Face objects appear clear. If the object on the part of the face have a little shadow (shadow), this does not reduce the image, the image would add nuance.
4. Rear light from objects
When taking in outdoor objects (outdoor) should avoid taking pictures of the sun challenging. Taken with the challenging sun, the body of the object will appear dark. Moreover, if the sun is too strong then the entire object will appear black. Results such as this image can produce images siluet.
5. Morning Light
Photograph the object by using lighting in the morning is recommended. The morning light will produce a soft tonal colors. Results obtained by the image is relatively good, sounds good landscape (scenery) and human objects.
6. Afternoon Light
Photographs on the day the item is not recommended because of the nature of the lighting is too strong so that the resulting image tended to over Exposure, even though the settings APERTURE and SHUTTER speed is appropriate.
7. Light Day Afternoon
Utilization of the afternoon light is recommended in the shooting. Nature of lighting in the afternoon with the same morning. Moreover, when the sunlight intensity slightly decreased, at 16:00 down.
8. Day Night Lights
Utilization of light at night is actually using the light generated by the lamp as the light outside. Do not rely too flash because the results will not be natural. To menyiasatinya, SHUTTER photographer can use a low speed without additional lights flash. Unfortunately, the low speed SHUTTER akan make the image does not become a maximum, therefore, to address them photographer can be assisted with the use of a tripod.
Recommended for taking in the morning hours 06.00 - 09.00 and the afternoon at 16:00 to 18:00. Section, in the time-period there is good lighting.
10 May 2009
ADOBE MEDIA PLAYER

This utility is driving the fusion of TV and the Internet, enabling you to watch Internet-delivered TV and video podcasts
Adobe Media Player is a next-generation desktop media player, providing high-quality video playback of streamed, downloaded or locally stored Internet TV shows and video podcasts.
DOWNLOAD ADOBE MEDIA PLAYER
09 May 2009
Fix Over/Underexposed Images
Fix Overexposed Images
The easiest way to fix an overexposed photo is to open it in Photoshop and choose Image> Adjustments> Shadow/Highlight. You'll see an immediate change in your photo and it will probably be too extreme, but just use this setting as a starting point. Photoshop ships with defaults that are often way over the top. Just play with the Amount Slider and the Tonal Width Slider in both the Shadows and the Highlights until you find just the right balance.
Fix Underexposed Images
So how easy is it to fix an underexposed photo? Very easy. Open your photo up and choose Image> Adjustments> Shadow/Highlight. You'll see an immediate change in your photo and it will probably be too extreme, but don't panic. Photoshop ships with defaults that are often way over the top. Just play with the Amount Slider and the Tonal Width Slider until you find just the right balance.
(as inspired by jennifer a.)
08 May 2009
Making Sepia Tone Effect
Making Sepia Tone effect is very simple because Photoshop CS has a Sepia Tone setting in its collection of photo filters.
Start with your color photo and choose Image> Adjustments> Desaturate. This brings us to a grayscale version without having to convert, so we can still add some color. The next step is to apply Photoshop's pre-packaged Sepia photo filter. You do this by choosing Layer> New Adjustment Layer> Photo Filter.
This will bring up the New Layer dialogue box. Enter the following settings:
Color: None
Mode: Normal
Opacity: 100%
Choose OK.
Now you will see the Photo Filter dialogue box. Enter the following settings:
Filter: Sepia
Density: 50% (or experiment)
Preserve Luminosity: Selected.
Choose OK and you're done.
Now I'll show you a way to create a Sepia Tone effect which will give you much more control over your results. This is the workaround for those without PS CS.
Convert To Grayscale & Apply A Duotone
Start with your original, untouched photo. Choose Image> Mode> Grayscale. A dialogue box will appear that says "Discard color information?" The answer is yes, so click OK. Now we'll create our Sepia effect by applying a Duotone.
Choose Image> Mode> Duotone. This will bring up the Duotone Options dialog box. First make sure that Type: Duotone is selected.
We need to pick two different inks. Ink 1 will be EB8B23. Just click on the little color square and enter the number via the Color Picker. You must name your Inks so name this one SEPIA 1 (or whatever you wish). Repeat this for Ink 2. You may find that the Custom Color box that appears is set to Pantone. Simply click on the Picker Button on the right side and you'll get your original color picker. Enter 000000 for the black we want and SEPIA 2 for the name. Finish this step by clicking OK.
Go back to RGB mode now. Choose Image> Mode> RGB Color. Next we'll play with the saturation levels to make the effect more subtle. Choose Image> Adjustments> Hue/Saturation. Move the Saturation slider to the left, down to -40%. Done!
Tweaking Opportunities
Everyone has their own idea of exactly what Sepia means and how rich the reddish brown should be. Experiment with the main Duotone color (but leave the black) and also experiment with the Saturation levels. Get in the habit of creating new layers for each tweak so you can turn them on and off to perform some comparative analysis.
(inspired by jennifer a.)
07 May 2009
Windows 7 Release Candidate (RC) Build 7100 Siap Download
Windows 7 Release Candidate (RC) Build 7100 kini telah tersedia bagi publik dan bisa diunduh pada situs resmi Microsoft. Produsen software raksasa itu juga telah menyediakan kode aktivasi bagi Windows 7 RC.
Untuk mendownloadnya Anda bisa mengunjungi situs resmi Windows (http://www.microsoft.com/windows/windows-7/download.aspx). Pada halaman pengunduhan, cari kolom di bagian bawah untuk mendownload Windows 7 RC yang memiliki nama lain Build 7100 ini. Pada kolom pemilihan specific language, sign-in di Windows Live ID dan dapatkan langsung product keys-nya.
User diharapkan memperhatikan tanggal 'kadaluarsa' di Windows 7 versi beta dan RC. User harus mengaktivasi terlebih dahulu saat mencoba menginstal versi beta dan RC tersebut, atau ada tanda peringatan dari Microsoft.
Saat melebihi tanggal 'kadaluarsa', siap-siap saja PC Anda akan dimatikan sendiri setiap 2 jam. Windows 7 Beta memiliki tanggal kadaluarsa sampai 1 Agustus 2009 (PC akan otomatis mati setiap 2 jam, mulai 1 Juli 2009). Sementara Windows 7 RC memiliki tanggal kadaluarsa 1 Juni 2010 (PC akan otomastis mati setiap 2 jam, mulai 1 Maret 2010)
Berikut ini adalah kunci aktivasi Windows 7, 32-bit (x86) and 64-bit (x64):
● MVBCQ-B3VPW-CT369-VM9TB-YFGBP;
● C43GM-DWWV8-V6MGY-G834Y-Y8QH3;
● GPRG6-H3WBB-WJK6G-XX2C7-QGWQ9;
● MM7DF-G8XWM-J2VRG-4M3C4-GR27X;
● KGMPT-GQ6XF-DM3VM-HW6PR-DX9G8;
● MT39G-9HYXX-J3V3Q-RPXJB-RQ6D7;
● MVYTY-QP8R7-6G6WG-87MGT-CRH2P;
● RGQ3V-MCMTC-6HP8R-98CDK-VP3FM;
● Q3VMJ-TMJ3M-99RF9-CVPJ3-Q7VF3;
● 6JQ32-Y9CGY-3Y986-HDQKT-BPFPG;
● KBHBX-GP9P3-KH4H4-HKJP4-9VYKQ;
● BCGX7-P3XWP-PPPCV-Q2H7C-FCGFR;
● P72QK-2Y3B8-YDHDV-29DQB-QKWWM;
● 6F4BB-YCB3T-WK763-3P6YJ-BVH24;
● 9JBBV-7Q7P7-CTDB7-KYBKG-X8HHC
15 April 2009
Photoshop -> Hide Palettes
In Adobe Photoshop when you want to check the results without disturbed by the number of palette and icon, only the Tab key you need. Press Tab to hide and press again to return the display palettes.
Photoshop -> Sembunyikan Palette
Ketika Anda ingin memeriksa hasil editing di Adobe Photoshop tanpa terganggu oleh banyaknya palette maupun icon, maka hanya tombol Tab-lah yang Anda perlukan. Tekan Tab untuk menyembunyikan dan tekan lagi untuk kembali menampilkan palette semula.
Subscribe to:
Posts (Atom)